Chapter Text
IMPORTANT: If you have questions, or doubts, or want to ask about some special CSS effect, you can ask about it in the comments: I always check them. Even if this guide is a bit old, every time I get a message I answer, so don't worry about me ignoring them just because this work is old.
Okay, fellow writers, let's get started!
First of all, I want to reassure you all: you don't need to be a HTML or coding expert to do this. I'm not the most digitally inclined lady out there, but I still managed to do it, so you can do it too!
To have your text in color, the first thing you need to do is log-in and then click on the "Skins" link on the left side of the dashboard.
Once there, click on "My Work skins" and this will lead you to a page with the same title.
Now click on the "Create work skin" button on the upper right side of the page.
Give a title to your work skin, for example I called the one I'm using for this guide "sparks of rainbow".
Make sure to give your work skin an original name, because if there is an already existing one with the same name, the site won't accept it. For example, you could choose to give the work skin the same name of the work you're going to use if for.
Then you can (or not) add a description of what happens when you use the skin, like "multiple colors available for text".
Now comes the hard part, the CSS...Nah, it's really not hard, believe me! Just follow these steps and don't worry!
In the CSS part, you need to write the code like this (I'm using the color I called "Donnie-s-mask" for the example):
#workskin .Donnie-s-mask {
color: #950cf5;
}
The code at the end, in this case #950cf5, is the HTML color code I chose for the text, in this case a cute purple.
It's better to always use the color code instead of the color name, because not all of them work. To be more accurate, only the names with the words all cramped up are supported (for example the color MediumOrchid, color code #BA55D3), while the names with separated words (for example the color named Venom Green, color code #728C00) are not supported, so sticking to the color codes is the best solution, also because this will give you a wider selection of colors to choose from.
To use the color name in the CSS, you need to write the code like this (I'm taking the color LightSeaGreen for the example):
#workskin .water {
color: LightSeaGreen;
}
which is a lovely aqua green.
If you want to use the names, you can find a list of the supported HTML color names here.
If you want to use the codes instead, you can find lists of HTML color codes here, here, here and here.
Here you will find a sort of encyclopedia of HTML colors, with an amazing number of colors available.
Here you can find another list of HTML colors, which also includes fluorescent colors and metallic colors (just use the HTML code and don't mind the names, because they are the names of the crayons and don't work in the CSS).
This site contains nine pages of HTML color tables, with each table containing several shades of a certain color (for example, shades of indigo, shades of aquamarine, shades of burgundy and so on), which is very useful if you want to create a gradient in shades of the same color.
If you use the color code, make sure that there is always the # before the number, like this: color: #950cf5;
This is because without it, the workskin can't recognize it as a color and it won't work. The # is not necessary if you use the color name instead.
A small suggestion: I found that using the HEX color codes instead of the rgb codes is safer, as it's less likely to cause trouble when you use them in a workskin. If you find a rgb color you like, or if the code given by the gradient generator contains rgb codes instead of HEX codes, you can use this rgb to HEX converter to get the matching HEX code for each rgb code.
You can also use this very helpful color picker, which will give you the HEX color code and also show you many other shades of the chosen color, each with the matching HEX code.
You don't have to rewrite the code every time: you can simply copy the one I wrote here and paste it into the CSS, just changing the name and the color code (from Donnie-s-mask and #950cf5 to Mikey-s-mask and #ffa500 for example).
The important thing to remember is that, if the name is composed of more than one word, you MUST add this line - between the words. And the name should be composed of max three words.
You can only apply one workskin at a time to your work, but the good news is that you can add several codes to your workskin. For example, in my "sparks of rainbow" workskin I added a total of 70 codes without problem and there is still room for more.
Here are some codes ready for you to use:
#workskin .Mikey-s-mask {
color: #ffa500;
}
which turns the text a cheerful orange;
#workskin .Leo-s-mask {
color: #4169e1;
}
which turns the text a lovely blue;
#workskin .Raph-s-mask {
color: #ff0000;
}
which turns the text a cute red;
#workskin .Imoen-pink {
color: #ff1493;
}
which turns the text a deep pink;
#workskin .raspberry-color {
color: #e30b5c ;
}
which turns the text a pretty red;
#workskin .Naruto-sunshine {
color: #ffff00;
}
which makes the text a bright yellow;
#workskin .verde-lime {
color: #00ff00;
}
which turns the text a bright green;
#workskin .cioccolato {
color: #87421f;
}
which turns the text a lovely brown;
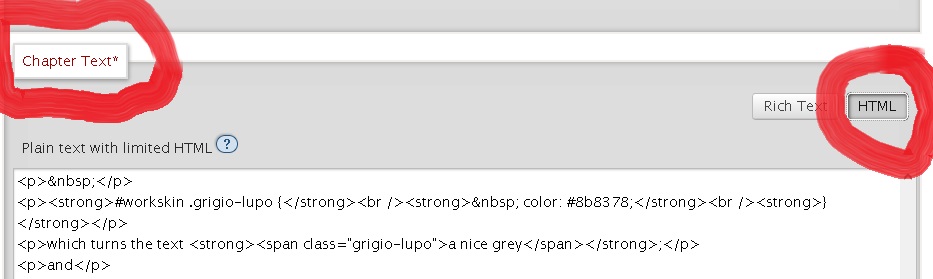
#workskin .grigio-lupo {
color: #8b8378;
}
which turns the text a nice grey;
#workskin .Gaara-s-eyes {
color: #00fa9a;
}
which makes the text the same seafoam green as Gaara's eyes.
and finally
#workskin .cherry-blossom {
color: #ffb7c5;
}
which makes the text the same lovely light pink as cherry blossoms
Okay, now you have your amazing, brand new work skin ready to go!
...But how to use it?
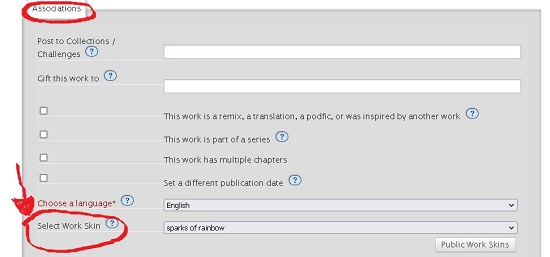
Easy enough: first of all, open the first chapter of your story/work you want to add colored text to, then click on the "Edit" button at the top of the page.
Now scroll down. In the section named "Associations" you'll see a section named "Select work skin". Click on it and you'll see a list of available work skins, including your custom one. Select the custom work skin you want to use and click "Post".
(Just a little warning: Basic Formatting is actually the default work skin for Ao3, the one that only allows the standard black text and standard font. It's automatically added to the list of work skins available by the site, but it's not one of the custom work skins, it's just the way they give to the users to sort of change the work back to the default settings.)
This passage is fundamental, because it will enable you to use the work skin on the whole work.
Now that the work skin is enabled, select "Edit" if the work has only one chapter, or “Edit chapter” for the chapter you want to apply the code to and in the section named "Chapter Text" (or "Work Text" is the work has only one chapter), select the HTML option instead of the “Rich text” option.
To make a word or more words appear in the color of your choice, you need to add the following code before the word/words:
<span class="Donnie-s-mask">
And after the word/words you must add the following:
</span>
Of course, I wrote Donnie-s-mask here because it's the color I'm using for the example, but you will write the name you gave to that specific color of your choice.
If you wrote the coding correctly, in HTML it will look like this:
She was walking in a garden full of <span class="Donnie-s-mask">purple</span> flowers that filled the air with a sweet scent.
And the result will look like this once posted:
She was walking in a garden full of purple flowers that filled the air with a sweet scent.
If you want to make a line or a whole paragraph in one color, simply put the <span class="xxx"> part before the beginning of the line or paragraph and the </span> part at the end of it.
For example, in HTML it is:
<span class="altro-blu">"Have faith, my friend. Love is a powerful force".</span>
and once posted it looks like this:
"Have faith, my friend. Love is a powerful force".
As for the paragraph, in HTML it looks like this:
<span class="lily-baby">The male fox turned to his companion, a beautiful female with the same silver-white fur as him, “We must split, Yuyu”, he told her in their animal language, his eyes of molten gold full of worry and fear for her, “Find a place to hide, I will keep him away from you”.</span>
and once posted it looks like this:
The male fox turned to his companion, a beautiful female with the same silver-white fur as him, “We must split, Yuyu”, he told her in their animal language, his eyes of molten gold full of worry and fear for her, “Find a place to hide, I will keep him away from you”.
If you want the whole chapter, or even just several paragraphs in a row, to be in one color, in HTML you need to write <div class="lily-baby"> before the start of the chapter or block of paragraphs and </div> after the end of the chapter or block of paragraphs. But make sure to put the <div class="xxx"> before the <p> at the beginning of the chapter and the </div> after the </p> at the end of the chapter. Of course I wrote "lily-baby" here but you will put in the code the name you gave to your color of choice (thank you to the guest helpline for pointing out this problem!).
So in HTML it is written like this:
<div class="Imoen-pink"><p>This is the first line.</p>
<p>This is the second line.</p>
<p>This is the third line.</p></div>
And once posted, the result is this:
This is the first line.
This is the second line.
This is the third line.
These codes also work on the Zalgo font, for example I'm making it pink (if you can't read it, it says "trying to make zalgo text in color"):
T̶̻͖̣̩͗̓̽̎͒̅͗̊͌̌͂͌͊̑͌ṛ̶̛͉͉̦͓̺̾̂̋̐̇́̐̄̔̐̐͠ỳ̷̩͎̣͓̹̞̯̝̪̟͇͚̜̮͔̟̲̎̌̀͂̆̋̓́̚í̵̤̬̓̋́̏̈́͆̔͗̍̍̉͘̕͠͝ń̴̡̛͍̩̬͙͎̬͉̰̒̈́͒̏̆͌̑̑̓̏̓́̽̕͝g̶̘̼̲̜̭̘̞͈̹̻͍͚̺̭̳̾̾̍̑̈́̀͐̕͘ ̵͙̿͛̄͆̆̒́͌͌̈́̀̉̇͘̕t̶̨̛̙̗̋̀̀͒̎̿̽͌̊͘o̴̧͙͙͙̥͈̬̜̦͕͕̼̼͋̓͒̈̌̓̌̆̏̂̓͑͘ͅͅ ̵̡̢̧̡̛̻̩̥̠̩̜̺̬̠̖̼̯͇́͛̂̈́̄̓̅̈́̍̃͘m̴̨̢̛͈͑͗͑̔͌́͋̓̈̀́̓͊̎̀̚͜á̴̡̳͔̪̞́̕͝ͅk̷̨̨̼̦̦̳̔̐̅̌̇ë̸̡̨͔̪͈̻̦͉͎̣͉́̂̈́̊͠ ̴̨̡̨̲͙͖̩̥̓̉̆̿̆̊̓̆͆̀̈̅̃͛͠z̸͔̬̞̹̟͓̲̠͉̠͔̗̆̎̈́̀͌́͐̀͗̓̏̕͜͜ḁ̷̬̫̣̳̹͉̃͗̉̽́̂̅̓̀̊̅͗͘͘͝ͅḻ̶̢̥͍̬̭̗̖̮̹̖̬̀̍̈̽̋́͂̉̐͌͒̾̅͘͜ĝ̵̨̘͔̥͖̱̌̿͋͑͐̊͊̍̋̓͘õ̴̢̢̬̣̬͎̜͉̩̟͙̥̦͍̙̰̞̏́ ̸̡̜̣̙͙̝́̓̏̍̀t̷̛̛̩̖͚͎͙̫̗̓̉̓̾͐̃̓̓́̐͊͋͘e̸̡̜͙̠͇͚̠͈͖͕̿̈͊̍̇̏̈̌͑̌̑̌̐̉͂x̶̢̳͚̪̞̥͖̯̝̰̻̝̮̟̰͉̓͐̃̈̀̾̒̎̊̈̾ͅţ̷̨̝̝̩̤̹̰̺͍̻̔̓́̐̀̇͂̽͠ ̸̛̛̤̙͕͔̱̳̹̣͖̫̞̻̝̩̋̄͂̾̊̄͌̾̑̕i̷̛͈̰̼̅͒̒̅̔̓̎͑̕͘͝͠ņ̶̢͓̩̤̹̼͕͙̋̓̍͐͘ ̶̡̠̤͎̺̹̮̲̻̻͍̣̼͙̞͓̈́̀̌̅̐͆͜ć̵̡̨̬̜̩͎̱̦͈̩̩̜̹͍́̒͑̄̄̒̇̀͛̃͠ô̴̹̿͐̀͑l̸͓͓̪̑͑͑̒͌̒̒̔̈́́o̷͔͒̃́͊͊̒͐̆̓̑̈̚̚͠r̴̡̨͍̻̤͕̤͉̰̹̥̖̹̝̾̋̌̿̽
To have your sentence as a whole in one color but with words in different colors in it, you can use both the div class and the span class commands like this (thank you to the user Sans_Tsuki for asking!):
<div class="Donnie-s-mask">This is the sentence in purple, with <span class="Raph-s-mask"> red words</span>, with <span class="Mikey-s-mask">orange words</span> and with <span class="Leo-s-mask">blue words</span> in it.</div>
Or you can use the <span class> command as usual like this (but be careful to remember to close all the <span> with a </span>. I'm making each <span> in the same color as the corresponding </span> here to help you visualize it better) :
<span class="Donnie-s-mask">This is the sentence in purple, with <span class="Raph-s-mask">red words</span>, with <span class="Mikey-s-mask">orange words</span> and with <span class="Leo-s-mask">blue words</span> in it.</span>
And once posted it looks like this:
This is the sentence in purple, with red words, with orange words and with blue words in it.
You can also have your text be in a certain color and size if you write the code like this (many thank to the user BrokenPaper for asking!):
#workskin .big-orange {
color: #ffa500;
font-size: 20px;
}
And this is the result:
This is the big orange text.
Or you can have the codes for the size and the code for the color be separate like this:
#workskin .twenty {
font-size: 20px;
}
#workskin .darkgreen {
color: #228B22;
}
And you can use them to have the whole sentence in one size with only a few words in color like this:
<span class="twenty"> This is the main sentence <span class="darkgreen"> with only a few words in color </span> and the rest of the sentence. </span>
With this result:
This is the main sentence with only a few words in color and the rest of the sentence.
Or you can use them to have the whole sentence in one color and only few words in a different size like this:
<span class="darkgreen"> This is the sentence in one color <span class="twenty"> with a few bigger words </span> and the rest of the sentence. </span>
and this is the result:
This is the sentence in one color with a few bigger words and the rest of the sentence.
Next chapter contains the codes to create your text with a gradient effect, both linear gradient and radial gradient, so that your text will look like a beautiful rainbow!